Designing for Digital Print
Image Quality
- The optimum quality to supply images is 300 dpi (dots per inch). Images greater than 300 dpi take extra time for the presses to process, without gaining any improvement.
- Some images for posters may be too large in file size to supply at 300dpi. If this is the case, you can either reduce your images to 200dpi, or resize your whole artwork to 75% of the final print size. This is acceptable for posters. The general rule of thumb is around 40MB per square metre.
Layers
- If working in layers, please flatten all layers before converting to PDF. Layers can be missed if not flattened beforehand.
Fonts and Text
- If an uncommon font is used, please convert the font to paths before supplying a PDF or InDesign file.
- If you are supplying your artwork in InDesign, please ensure that the file is packaged with all fonts and linked graphics.
- If designing for a file that has bleed (see below), please ensure that your text is at least 3mm INSIDE the crop marks, to ensure that it doesn’t get cut off.
- Please also ensure that any white text is not set to ‘Overprint’ as it will disappear when printed.
Colours
- We accept files in either Pantone or CMYK colours. If your file is CMYK and you are trying to get a specific pantone colour then please let us know what that colour is.
- If a rich solid black is required in a full colour print, supply the black as 4 colours (C75, M75, Y75, K100) instead of a single black colour.
Booklet Making
- When designing booklets, don’t try to impose it yourself (unless you REALLY know what you’re doing). Simply supply each page as a single page within a multipage PDF. We can impose it quickly and accurately for you.
- Please remember to number the pages for your booklets (if numbering is required in your design).
File Size
- If you are emailing files directly to CQ please ensure they are no bigger than 10MB. If your file is larger than 10MB please use www.dropbox.com or we can pick up a disk from you (free pick up in Chch for jobs over $100) .
Most importantly… Please ensure that all artwork has crop marks and bleed where required (see below).
What is Bleed?
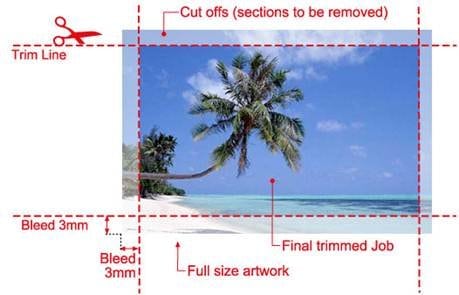
- Machines don’t print to the edge of paper, so the paper has to be trimmed to size.
- If your artwork needs print right to the edge then you must allow for an extra 3mm around the edges of your artwork, that will be cut off.
- This extra 3mm is called bleed.

What are Crop Marks?
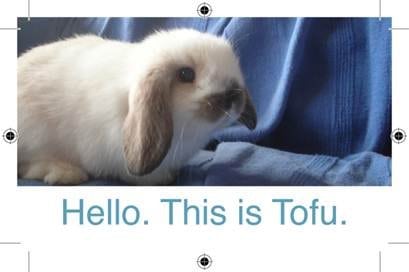
- Crop marks indicate bleed and show where the print is to be trimmed to size.
- Crop marks are placed in such a way that they cannot be seen once the print work is trimmed.

